Send coupon codes without an integration
```mediawiki Navigation: Main_Page > Apps > Ecommerce > Send coupon codes without an integration
Send coupon codes without an integration[edit | edit source]
Introduction[edit | edit source]
The "Send coupon codes without an integration" feature in ActiveCampaign allows users to distribute coupon codes directly to contacts via email, without needing to rely on integrations like Shopify or WooCommerce. This feature is particularly valuable for businesses looking to promote special offers, increase customer loyalty, or drive repeated sales by issuing unique coupon codes to selected contacts. Understanding how to utilize this feature effectively can help you engage customers in personalized marketing efforts and boost conversion rates.
How to Access This Feature[edit | edit source]
To access the functionality for sending coupon codes without an integration, start by logging into your ActiveCampaign account. Ensure you have the appropriate plan—this feature is available for the following plan types: Starter, Plus, Pro, and Enterprise.
Step-by-Step Instructions[edit | edit source]
Follow these detailed steps to import and distribute coupon codes to your contacts using email:
Upload Coupon Codes[edit | edit source]
1. First, export all contacts who are going to receive a coupon code from your ActiveCampaign account. 2. Format the exported file:
- Remove all columns except the email address. - Next to the email address column, add a column titled Coupon Code. This column will serve as the name of your new custom field when you imported the coupon codes later. 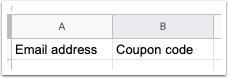
3. Generate your list of coupon codes from your third-party application. 4. Copy the generated coupon codes and paste them into the Coupon Code column of the file you exported from ActiveCampaign. Save the final file as a CSV. 5. Now, you will import this file to assign the coupon codes to the respective contacts:
  - Click on Contacts in the left-side menu.
  - Click on Import in the top right of the page.
6. Select Import from file. 7. Choose the CSV file you saved earlier from your hard drive. 8. On the import page, map your Coupon Code column to your custom field:
- If this field does not exist, click on Add New Field from the Map into Field dropdown. 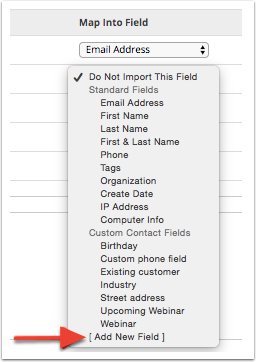
9. Choose the appropriate field type (in this case, select Text input) and click Next. 10. Specify the name of your custom field as Coupon Code and click Save. 11. In the Import Options box, ensure you check Update existing contacts while importing and then click on Import Now.
Please note that you do not need to select a list; ActiveCampaign will automatically update the contacts in your CSV file with the new custom field.
Once the contacts are updated, you will see the newly created custom field on each contact's profile. Additionally, a personalization tag will be generated for your new field, allowing you to use it in your communications.
Insert Coupon Codes into a Campaign[edit | edit source]
After importing the coupon codes, the next step is distributing them to your contacts via an email campaign. To insert the coupon codes into your emails, follow these steps:
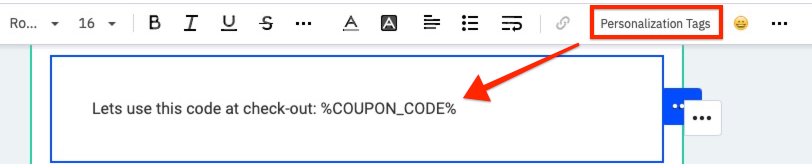
1. Open your desired direct or automated campaign and click on a text box to edit it. 2. Type your introductory message to contextualize the coupon code. 3. Place your cursor where you want the coupon code to appear. Click on Personalization Tags in the toolbar. 4. Click on the Coupon code field in the modal that appears. This action will insert your personalization tag as it relates to the coupon code into the email:
5. Before sending out the campaign, test it by sending it to a test contact that has a coupon code. Please note that sending a test version will not display values for personalization tags.
Configuration Options and Settings[edit | edit source]
When working with coupon codes in ActiveCampaign, the following configuration options are essential:
- Coupon CodeColumn: This custom field will store the individual coupon codes assigned to each contact. - Text input: When creating the mapping for your coupon code field, selecting this type ensures that the field accepts alphanumeric and special characters typically used in coupon codes. - Import Options: By selecting the option to Update existing contacts while importing, you ensure that the coupon codes are refreshed in your contacts' profiles without needing to select separate lists.
Best Practices and Tips[edit | edit source]
- **Thoroughly test** your personalization tags and coupon code contents by sending test emails to verify that everything appears correctly before the actual distribution. - Consider creating unique coupon codes for different customer segments to personalize the offers, enhancing engagement. - Keep your list of coupon codes organized and updated regularly to ensure that you're sending valid codes to your contacts.
Troubleshooting Section[edit | edit source]
If you encounter issues while following these steps, consider the following common problems and solutions:
- **Import Error**: If your import does not work, ensure that the CSV file is correctly formatted without any additional columns apart from the email address and coupon code. - **Missing Personalization Tags**: Verify that you correctly created and mapped the custom field when importing; any typos will prevent the tags from functioning. - **Email Testing**: Remember that test emails sent for personalization verification will not render values. Always check in the contact profile to see the assigned coupon code.
Related Features[edit | edit source]
Learn more about these related features to enhance your email marketing and customer engagement:
- Automation: Automate your marketing campaigns for better engagement. - Personalization Tags: Explore the power of personalization in ActiveCampaign emails.
FAQ[edit | edit source]
1. Can I use this feature with Shopify or WooCommerce?[edit | edit source]
No, this solution is intended for customers not using the Shopify or WooCommerce native integrations.
2. What type of file format do I need for importing coupon codes?[edit | edit source]
You need to save your file in CSV format for successful importation.
3. How do I ensure my coupon codes are unique for each user?[edit | edit source]
It’s crucial to generate unique codes from your third-party application prior to importing them into ActiveCampaign.
4. Is there a limit to the number of coupon codes I can import?[edit | edit source]
While there is no specific limit mentioned, it’s advisable to check with your ActiveCampaign plan's contact storage limits.
5. How can I test the campaign effectively?[edit | edit source]
Send the campaign to a test contact with a coupon code assigned in their profile to see how the email renders.
6. What if I make a mistake in the imported coupon codes?[edit | edit source]
You can re-import the corrected CSV file following the same process, which will update the existing coupon fields in the contacts' profiles.
7. Can I create coupon codes sequentially for customers?[edit | edit source]
Yes, you can generate a sequenced list of coupon codes through your third-party application before importing them, ensuring a systematic approach to distribution. ```